
TERMINATOR AR FILTER
Interactive Engineer Design Test of Tiktok
Take Home Test I January 2020
Interaction Design & Prototype
Individual Work
Project Overview
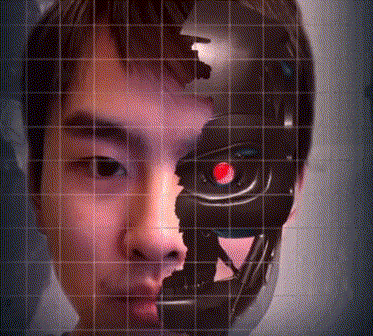
This project is an AR filter for users to have some fun interactions with the front camera. In order to create an innovative and interesting filter, I focus both on the concept as well as the technologies. With the topic of the Terminator, this filter is trying to show the scenes in sci-fi movies and unlike the current filters, it has the narrative of how the terminators get to its finally form. Also, there’re a lot of interactions within this filter, with the goal to maximize the immersive experience for users.

Work Flow
The workflow of this project is first by having a brief research of the current AR filters. After the research I picked the sci-fi topic with the specific concept of the Terminators. Then the general style can be decided under the mysterious and little horrible atmosphere. The next step is to try some common techniques so that I know the concept can really work. The first demo is to make the simple face mask only with customized textures. And then I tried some 3d models together with the face tracking. The color filter is also another important method to use, even though it wasn’t used in the final test.
One important attribute of this filter is how 3d technologies can be used in AR filters. I tried several ways to combine the 3d models and the video footages. And it is definitely a challenge to make a realistic combination. In the final test, I focused on the interactions and tried to make it complete.

Research of Current Filters
First I did a brief research of the filters in current popular platforms such as Tiktok, Instagram, Likee
and Snapchat. Tough in different platform the filters are divided by different categories. There’re some
common popular topics like “Funny”, “Wired”, “Love” etc. Then I started analyzing some of the interesting filters, testing to find both their shining points and problems.

After that it is also important to figure out how each filter was built by different techniques. In general,
there are 4 major elements (ways) in the filter, the 2d sprites (both static images or animation sequences), the 3d object, the color lens and the sound effects. Most of the filters can be built with these elements, with the common way of the ‘patch Editor’ to make the interaction.

Concept
After all the research, I chose the sci-fi topic, which I think is both attracting and has more potential to
explore with multiple techniques.

I start with looking for references within the sci-fi topic and thinking about the design style of the final
filter. Then I put my concept into 3 stages with different interactions


Prototype (Test on Techniques)
After that it is also important to figure out how each filter was built by different techniques. In general, there are 4 major elements (ways) in the filter, the 2d sprites (both static images or animation sequences), the 3d object, the color lens and the sound effects. Most of the filters can be built with these elements, with the common way of the ‘patch Editor’ to make the interaction.

3d Modeling and Animation
In order to have a good match with the video footage, the 3d model must be optimized so that to better fit the face mask and video background. I tried several times to test the boundary of the model, makin sure it can be covered by the face mask in different scenarios.

Another big challenge is to make the 3d model match the mouth open action. In order to do so, first I
did the 3d animation in C4D by changing the rotation and position of the jaw. Then the process of the
animation needs to match the openness of the mouth.

Materials
After finishing the 3d elements, I started to prepare materials. First step was to modify the original face texture. Since I got three different stages, I did three face textures, with the first one only has minor damage, the second one will show the mechanical eyeball and third one will have half of the robot face. The key is to make alpha channel for the texture and use it as the mask. In this way we can see the 3d object behind the transparent materials.

For other metal materials, I used the diffuse, normal and roughness texture to make them more realistic.


Lightings
In this project, I used very basic directional light. The major light is from the top front while the secondary light from the opposite direction. The goal to have two lights is mainly to get different color effects. Especially for the metal materials, the cold light will give cold tones to the dark park, which can have a better looking.

Final Interaction in AR
The final step is to write the interactions and get everything linked together. As mentioned, all the elements, including 3d elements, canvas UI, 2d animation sequence, lighting and sound should be finalized and be put into the scene.

UI DESIGN
Since this project is an AR filter and focus on the visual part, I designed this interface mainly based on
the emotional expression. With lots of high-tech elements, the goal is to create a future experience for
the users and make the interface looks like what we see in the sci-fi movies.

Interactions
The logic of the interactions can be roughly divided by five parts. First detect the signals, for example
the mouth opening, eye blinking or screen tap, then control the visibility of the objects. After the objects are shown, the animation will then be played. At the same time, I need to know the condition if other interactions need to be activated. Finally I put the sound effect cooperated with the actions with the same logic.


FINAL DEMO AND VIDEO
These are the final demo video clips. You can find the video link below on my vimeo page. I tried the demo filter on my phone with Spark AR player, but the it seems to heavy to be packaged to other platform such as instagram or facebook.

